Quick start
This section will introduce you to Unfurl by creating a simple project that deploys a web application. Once you get this working, you can customize it for your own application.
Tip
The steps here follow the high-level overview of Unfurl found in the Solution Overview chapter.
Step 1 Create a project
The first step is to create an Unfurl project to manage your deployments:
unfurl init myproject --empty --var std true --design
This will create an Unfurl project in directory “myproject”. The –empty option skips creating an ensemble (a deployment) for now (we’ll add that later in step 3).
The –var option passes settings to the project skeleton templates that create the project. When the default project skeleton sees std, it adds our Unfurl Cloud Standard TOSCA library repository, which includes TOSCA types that provide basic abstractions for resources like compute instances and container images.
The –design option initialized your project for development, in particular, it will download the std repository so that if you open service_template.py in an Python IDE such as VS Code the Python import statements will resolve, enabling your editor’s type checking and code navigation.
(If you didn’t do use that option, this will happen when you first deploy an ensemble or when you run the validate command.)
If this is the first time you’ve created a Unfurl project, you’ll notice a message like “Unfurl home created at ~/.unfurl_home”. Unfurl home is an Unfurl project that contains local settings and resources that are shared with other projects on that machine, including an isolated execution environment to run Unfurl in. For more information, see Unfurl Home.
Step 2: Describe your application
Now that your project is set up, we’ll create a TOSCA blueprint for deploying our application. In this example, it’s a container image of a simple nodejs web app that requires a connection to a Postgres database. Here are some of the tasks we need to do to deploy this web application:
Create a service that can run the container image.
Deploy a database and connect it to the web app.
Consider DNS to resolve to the web app.
You can create your TOSCA blueprint in either YAML or Python. If you want to use YAML, add the blueprint to the project’s ensemble-template.yaml file so that it can be reused by different Ensembles. If you want to follow along using the Python examples, edit the service_template.py file.
Copy the code below to either service_template.py or ensemble-template.yaml. They are equivalent, in fact you can bi-directionally convert them using the unfurl export command.
import unfurl
from unfurl.configurators.templates.docker import unfurl_datatypes_DockerContainer
from tosca import Size, TopologyInputs, gb, mb
from tosca_repositories import std

class Inputs(TopologyInputs):
    disk_size: Size = 10 * gb
    mem_size: Size = 2048 * mb

db = std.PostgresDB()

host = std.ContainerHost()

container = std.ContainerService(
    environment=unfurl.datatypes.EnvironmentVariables(
        DBASE=db.url, URL=std.SQLWebApp.url
    ),
    host_requirement=host,
    container=unfurl_datatypes_DockerContainer(
        image="registry.gitlab.com/gitlab-org/project-templates/express/main:latest",
        ports=["5000:5000"],
        deploy={"resources": {"limits": {"memory": Inputs.mem_size}}},
    ),
)

__root__ = std.SQLWebApp(container=container, db=db, subdomain="myapp")
# add this to ensemble-template.yaml under
# spec:
#   service_template:
topology_template:
  inputs:
    disk_size:
      type: scalar-unit.size
      default: 10 GB
    mem_size:
      type: scalar-unit.size
      default: 2048 MB
  node_templates:
    db:
      type: PostgresDB
      metadata:
        module: service_template
    host:
      type: ContainerHost
      metadata:
        module: service_template
    container:
      type: ContainerService
      requirements:
      - host: host
      properties:
        environment:
          DBASE:
            eval: ::db::url
          url:
            eval: ::[.type=SQLWebApp]::url
        container:
          image: registry.gitlab.com/gitlab-org/project-templates/express/main:latest
          ports:
          - 5000:5000
          deploy:
            resources:
              limits:
                memory:
                  get_input: mem_size
    __root__:
      type: SQLWebApp
      requirements:
      - container: container
      - db: db
      properties:
        subdomain: myapp
  root:
    node: __root__
Here we declare a few abstract resources: a service to run the container, a Postgres database, and a web application as the public root of the blueprint, along with some Inputs to parameterize the blueprint. The parts of the blueprint that are not abstract are specific to our actual application: the container image we’ll use and the environment variables it expects. In the next step we’ll instantiate those abstract types with implementations appropriate for the environment we’re deploying into.
Step 3 Instantiate your blueprint
Now that we have a model, we can customize for different environments. In this example, let’s suppose there are two types of environments we want to deploy this into:
A production environment that deploys to AWS that installs the app on EC2 compute instance and deploys an AWS RDS database.
A development environment that runs the app and Postgres as services on a local Kubernetes cluster.
Let’s create those environments, along with a deployment for each:
cd myproject
unfurl init production --skeleton aws --use-environment production
unfurl init development --skeleton k8s --use-environment development
The --skeleton option lets you specify an alternative to the default project skeleton. We’ll assume we’re deploying it into AWS so we will use the aws project skeleton. You can see all the built-in project skeletons here or use an absolute path to specify your own.
Important
Store the master password found in ensemble/local/unfurl.yaml in a safe place! By default this password is used to encrypt any sensitive data committed to repository. See Managing Secrets for more information.
There are different approaches to customize a blueprint for different environments but a simple one is to declare deployment blueprints. A Deployment blueprint is a blueprint that is only applied when its criteria matches the deployment environment. It inherits from the service template’s blueprint and includes node templates that override the blueprint’s. In YAML, they are declared in deployment_blueprints section of an ensemble. In Python, a Deployment blueprint is represented as a Python class with the customized template objects as class attributes.
Add the following code below the code from the previous step:
import tosca
from tosca_repositories.std.aws.compute import EC2Compute
from tosca_repositories.std.aws.db import AwsRdsPostgres
from tosca_repositories.std import k8s
from tosca_repositories.std.dns_services import Route53DNSZone


class production(tosca.DeploymentBlueprint):
    _cloud = unfurl.relationships.ConnectsToAWSAccount

    host = std.HttpsProxyContainerComputeHost(
        host=EC2Compute(
            disk_size=Inputs.disk_size,
            num_cpus=2,
            mem_size=Inputs.mem_size,
        ),
        dns=Route53DNSZone(name="example.com"),
    )
    db = AwsRdsPostgres()


class dev(tosca.DeploymentBlueprint):
    _cloud = "unfurl.relationships.ConnectsTo.K8sCluster"

    host = k8s.PublicK8sContainerHost(
        labels={"kompose.volume.size": Inputs.disk_size},
        # match any unfurl.nodes.DNSZone template:
        dns=tosca.Requirement(node="unfurl.nodes.DNSZone"),
    )
    db = std.PostgresDBInstance(
        database_name="my_db", host_requirement=k8s.PrivateK8sContainerHost()
    )
deployment_blueprints:
  production:
    cloud: unfurl.relationships.ConnectsTo.AWSAccount
    node_templates:
      host:
        type: HttpsProxyContainerComputeHost
        requirements:
        - host: host_host
        - dns: host_dns
      host_host:
        type: EC2Compute
        properties:
          num_cpus: 2
          mem_size:
            get_input: mem_size
          disk_size:
            get_input: disk_size
      host_dns:
          type: Route53DNSZone
          properties:
            name: example.com
      db:
        type: AwsRdsPostgres
  dev:
    cloud: unfurl.relationships.ConnectsTo.K8sCluster
    node_templates:
      host:
        type: PublicK8sContainerHost
        properties:
          labels:
            kompose.volume.size:
              get_input: disk_size
        requirements:
        - dns: unfurl.nodes.DNSZone
      db:
        type: PostgresDBInstance
        requirements:
        - host: db_host_requirement
        properties:
          database_name: my_db
      db_host_requirement:
        type: PrivateK8sContainerHost
imports:
- file: aws/db.yaml
  repository: std
- file: k8s.yaml
  repository: std
- file: aws/compute.yaml
  repository: std
- file: dns_services.yaml
  repository: std
Here, each deployment blueprint replaces the “host” and “db” node templates with subclasses of those abstract types that are specific to the cloud provider we want to deploy into.
If you look at those implementations, you’ll see they invoke Terraform, Ansible, and Kompose. If we defined our own types instead of using these predefined ones, we’d have to implement operations for deploying them. See the Configurators chapter to learn how to implement your own as Ansible playbooks, Terraform modules, or by invoking Shell commands.
You can use the unfurl plan command to review the scripts and artifact Unfurl generates to deploys your ensemble. For example if we run
unfurl plan production
You’ll see something like this:
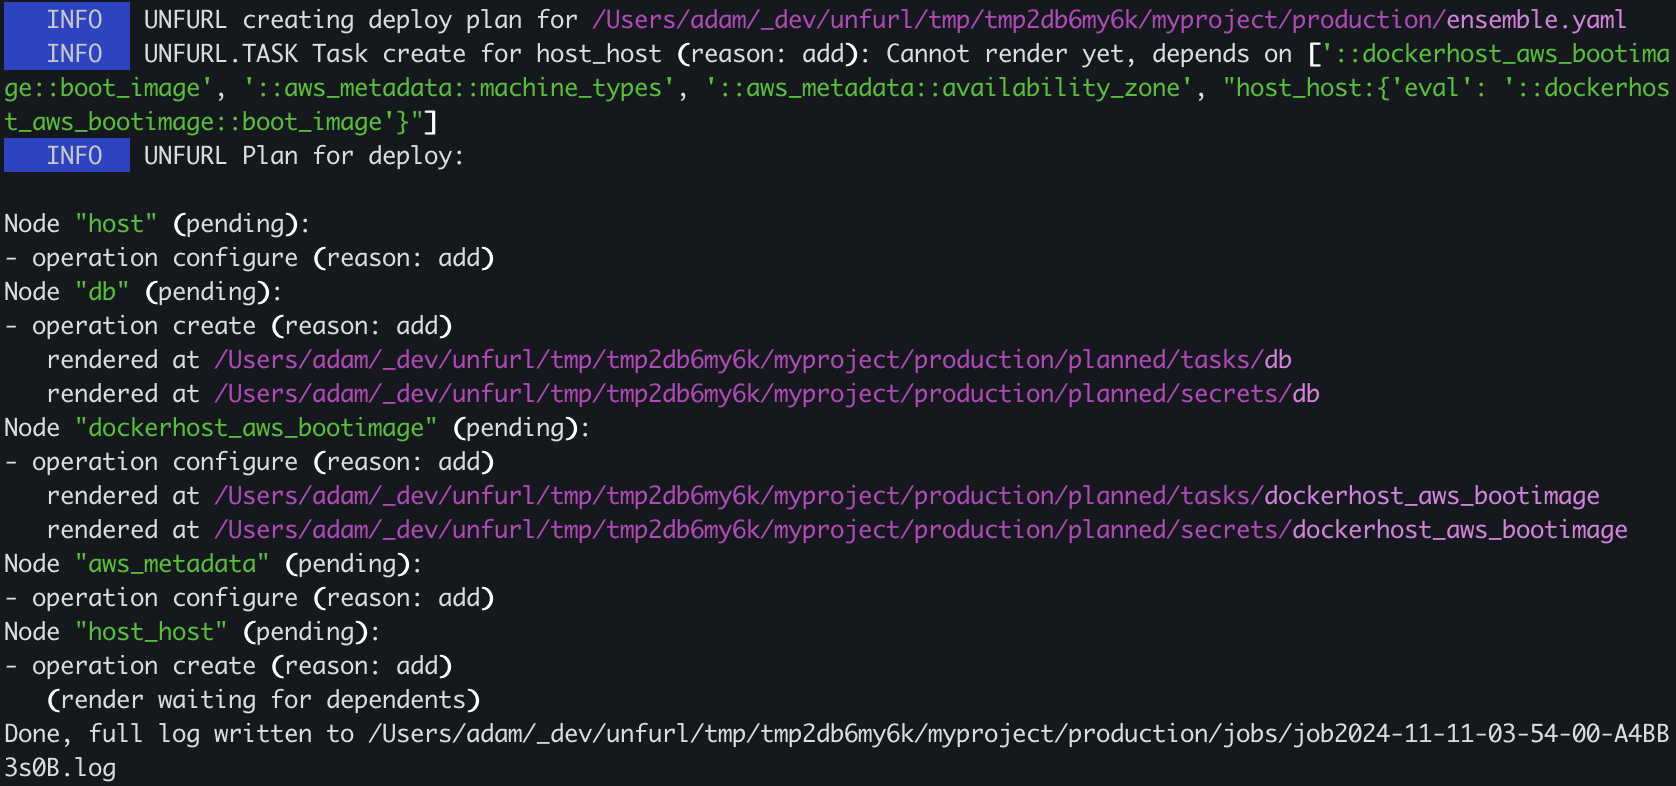
unfurl plan production output
The plan’s output includes the location of files that were generated (“rendered”) while creating the plan, for example, a Terraform module to deploy the AWS RDS database – see Generated Files.
Step 4. Deploy and manage
Now we’re ready to deploy our application. Run unfurl deploy development from the command line to deploy the development ensemble. You can also use the --dryrun flag to simulate the deployment.
After the job finishes, a summary is printed showing the results of each operation:
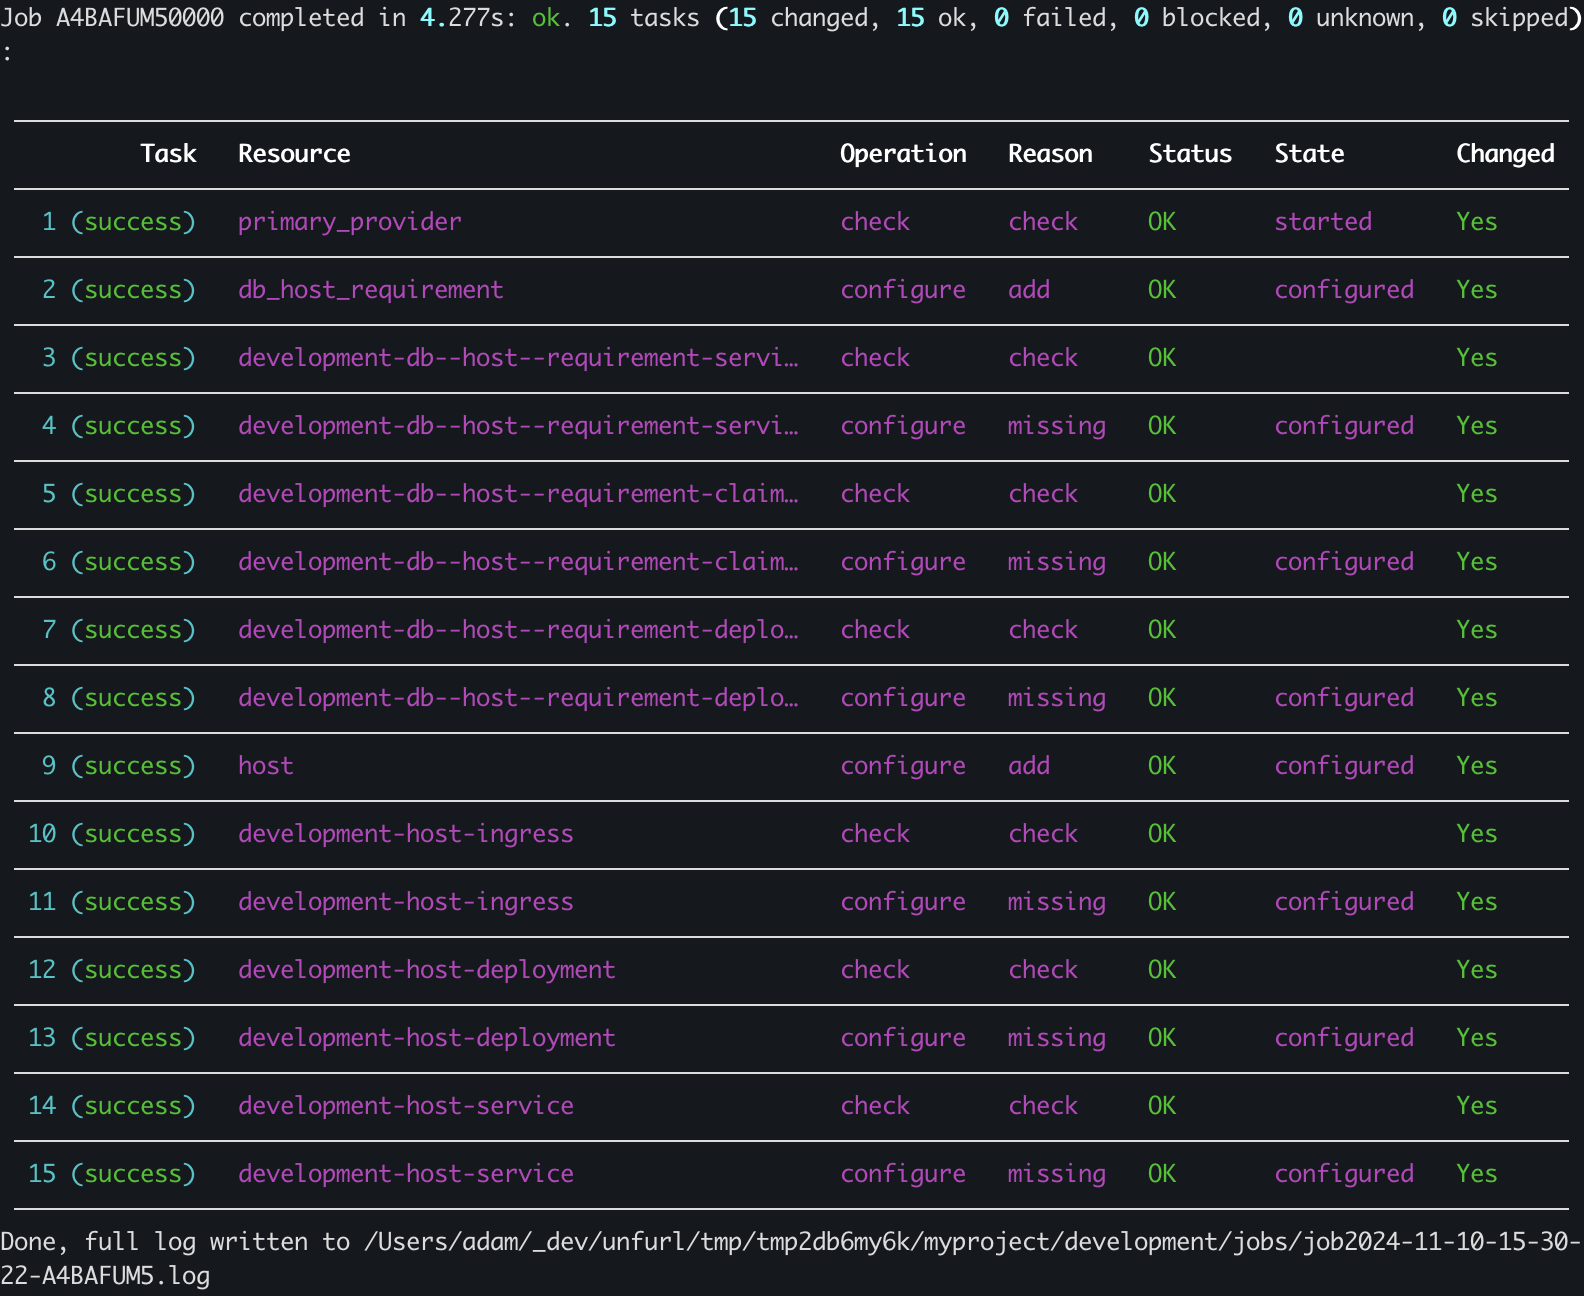
unfurl deploy development output
🎉 Congratulations on your first deployment with Unfurl! 🎉
Now that you’ve deployed your ensemble, here are some ways you can manage your deployment:
Commit your changes with unfurl commit. This will commit to git the latest configuration and history of changes made by the deployment, encrypting any sensitive data. (Or use
--commitflag with the deploy unfurl deploy command to do this automatically.)Run unfurl serve --gui to view and manage your deployment. Or host your repositories on Unfurl Cloud for a full-fledged, multi-user admin experience.
Run Ad-hoc Jobs.
If you make changes to your deployment’s configuration, re-running unfurl deploy will update the existing deployment.
Delete it using the unfurl teardown command.